 Save to Pinterest
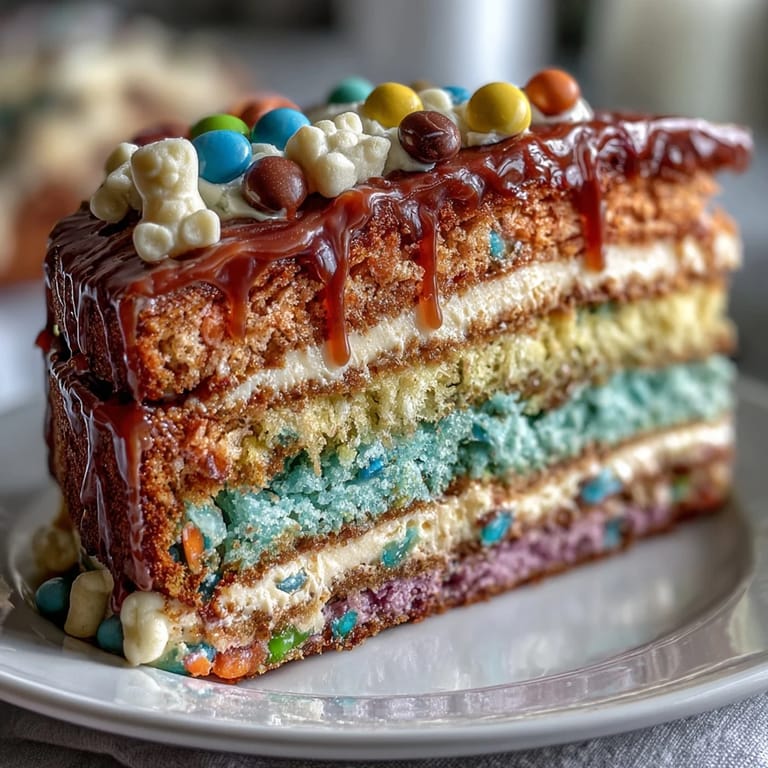
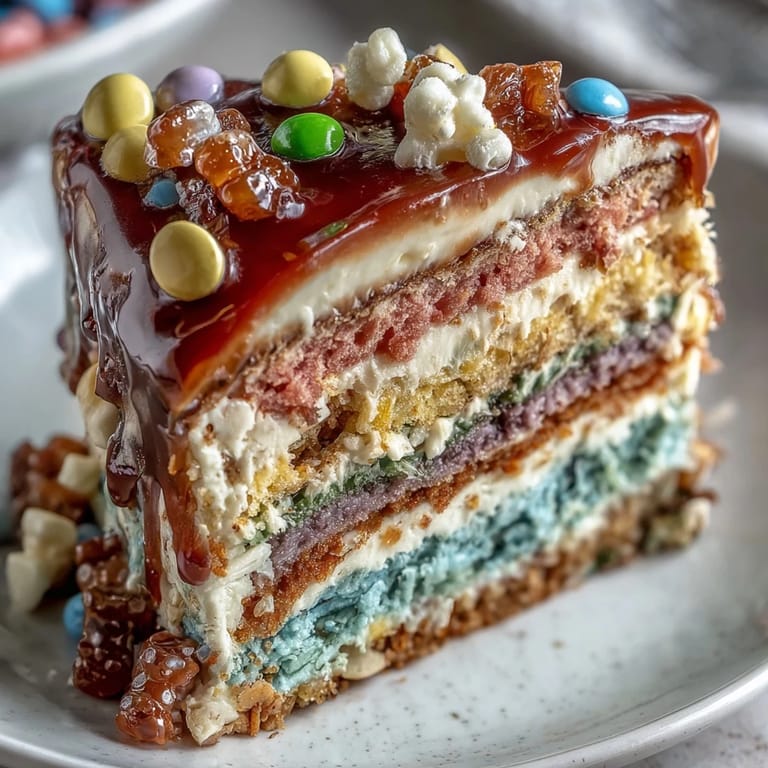
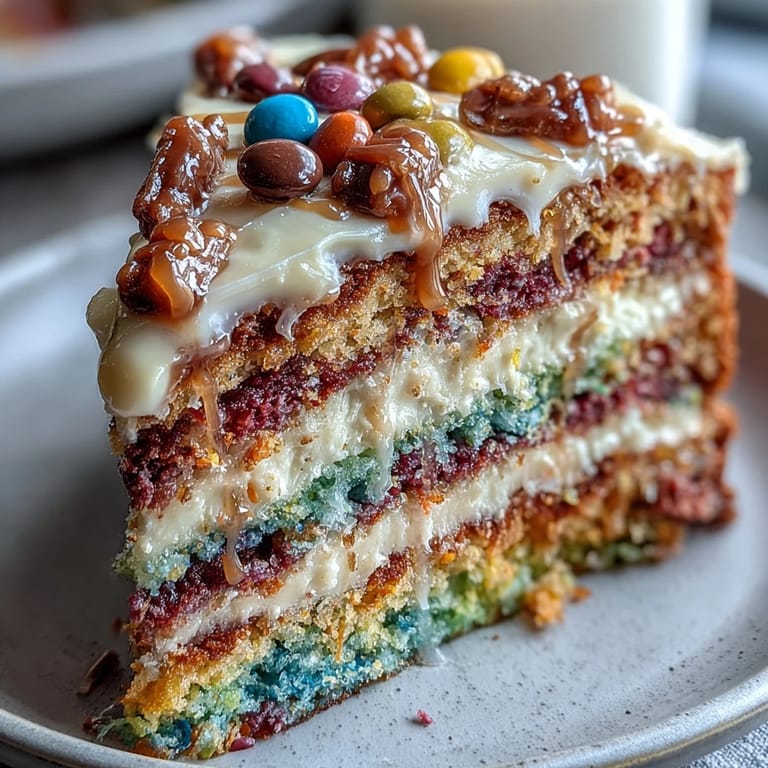
 My daughter's face when she cut into this cake and candy tumbled out like a broken piñata—that's the moment I understood why this dessert has become legendary at our Cinco de Mayo gatherings. It started as a wild Pinterest save, honestly, something I wasn't sure I could pull off. But the first time I made it, layering those jewel-toned batters and watching the kitchen fill with anticipation, I realized this wasn't just about technique. It was about creating a surprise that actually delivers joy.
I'll never forget making this for my nephew's quinceañera last summer—his little cousins kept asking if they could watch it bake, standing on tiptoes to peek through the oven window. By the time I was stacking the layers, the kitchen had become command central for the whole family, everyone whispering about the surprise inside. When the frosting went on and I handed him a knife to make the first cut, the room went silent. Then the candies started falling, and the whole house erupted.
Ingredients
- All-purpose flour (3 cups): The backbone of your layers—sifting it with the baking powder and soda ensures each colored tier rises evenly and stays tender, not dense.
- Baking powder and baking soda (2 ½ tsp and ½ tsp): This combination lifts the cake so it's cloud-light, which matters when you're stacking six layers—weight is the enemy here.
- Unsalted butter for cake (1 cup): Room temperature is non-negotiable; cold butter fights the sugar and won't cream properly, so pull it out 30 minutes early.
- Granulated sugar (2 cups): Creaming this with butter for a full three minutes creates tiny air pockets that give the cake structure and a delicate crumb.
- Eggs (4 large): Room temperature eggs blend smoothly into the batter; cold ones can break the emulsion and make your cake gummy.
- Whole milk (1 ¼ cups): Also room temperature—temperature consistency matters more than it sounds when you're alternating wet and dry ingredients.
- Gel food coloring (red, orange, yellow, green, blue, purple): Gel is essential here because liquid coloring waters down the batter; start with less than you think you need, as the colors deepen as they bake.
- Assorted small candies (1 ½ cups): Choose candies that won't melt or stick (M&Ms work beautifully), and avoid anything larger than a marble or the whole structure gets wobbly.
- Unsalted butter for frosting (1 ½ cups): Same rule—room temperature softened butter beats smooth and holds air, creating frosting that's spreadable but sturdy.
- Powdered sugar (5 cups, sifted): Sift it before measuring, not after, to remove lumps that'll create grainy frosting that frustrates you mid-decorating.
Tired of Takeout? 🥡
Get 10 meals you can make faster than delivery arrives. Seriously.
One email. No spam. Unsubscribe anytime.
Instructions
- Set the stage:
- Preheat your oven to 350°F and grease three 8-inch pans with a light hand—too much grease and your layers slip around when stacked. Line the bottoms with parchment paper so they release cleanly.
- Build the dry foundation:
- Whisk flour, baking powder, baking soda, and salt in a medium bowl until they're evenly distributed; this mixes the leavening throughout so each layer rises consistently.
- Cream the butter and sugar:
- In a large bowl, beat softened butter and sugar for a full three minutes until it's pale, fluffy, and almost mousses—this is where the cake's tenderness comes from, so don't rush it. The mixture should look lighter than when you started, almost like soft clouds.
- Incorporate eggs gently:
- Add eggs one at a time, beating well after each, so they emulsify into the butter mixture rather than sitting on top like oil and water. This creates a smooth, stable base for the layers.
- Alternate wet and dry:
- Add the whisked dry ingredients in three portions, alternating with the milk—start and end with dry ingredients to keep the batter from getting soupy. Mix just until combined; overmixing develops gluten and makes the cake tough.
- Divide and color:
- Divide the batter into six bowls and tint each with gel coloring, stirring gently until the color is even but not overdone. You're aiming for jewel tones, not neon—remember they'll intensify as they bake.
- Fill and bake:
- Pour each colored batter into a prepared pan (bake in batches if needed, keeping unbaked batters covered at room temperature) and smooth the tops. Bake for 15-18 minutes until a toothpick comes out clean and the edges spring back lightly.
- Cool with patience:
- Let layers rest in the pans for 10 minutes so they firm up and release cleanly, then turn them out onto wire racks to cool completely. Warm cake layers are fragile, so this step prevents crumbling disasters later.
- Create the surprise cavity:
- Once completely cool, use a 3-inch round cutter to hollow out the centers of four layers (leave the top and bottom whole), creating a cavity that'll hold your candies. Press the cutter straight down without twisting to keep the cut clean.
- Make the frosting silk:
- Beat softened butter until it's creamy, then gradually add sifted powdered sugar so it doesn't puff clouds of sugar everywhere. Add milk, vanilla, and salt, beating until it's smooth and pipeable, not grainy.
- Stack with intention:
- Place the solid bottom layer (purple looks beautiful at the base) on your serving plate, frost it lightly, then stack a cut-out layer on top. Repeat with all four cut-out layers, frosting lightly between each—too much frosting and the stack shifts.
- Fill the treasure chest:
- Pour your assorted candies into the center cavity, layering them so they nestle in rather than spilling out prematurely. Use a mix of colors and shapes for visual surprise.
- Top it off:
- Crown the candy-filled stack with the final solid layer, pressing gently so it sits level. This seals the surprise inside until the first slice reveals it.
- Frost the exterior:
- Generously frost the outside and top, using an offset spatula to smooth it or create a rustic texture. Chill the finished cake for 30 minutes—this firms up the frosting and makes slicing cleaner, revealing those candy layers with drama.
 Save to Pinterest
 There's a moment right before you slice this cake where everyone leans in, phones out, waiting for the reveal. That's when you know you've made something special—not because it tastes incredible (though it does), but because you've turned dessert into an experience, a memory, a story they'll retell.
The Magic of Color Theory in Cake
Watching those six layers emerge from the oven—each one a different color—never gets old. I learned that gel coloring matters because liquid food coloring adds water, and extra water throws off your flour-to-liquid ratio, making the cake dense or overly moist. The first time I used gel, the difference was obvious: the layers were taller, more delicate, and held their color better even after baking. Now I always keep gel in my baking drawer for anything that needs vibrant color without the wetness compromise.
Why This Works as a Celebration Cake
This cake isn't just pretty—it's interactive, which is rare for desserts. Most cakes sit politely on the table while people admire them, but this one demands participation, demands attention, demands that moment when the knife goes in and the surprise falls out. That shared gasp, that laughter—it's why people remember this cake years later. It's the edible version of breaking a piñata, which makes it absolutely perfect for Cinco de Mayo or any celebration where joy is the main ingredient.
Make-Ahead Strategy and Storage Wisdom
You can bake the layers a day or two ahead if you store them in an airtight container at room temperature or wrapped tightly in the fridge—they actually slice more cleanly when they've had time to set. I've also frozen baked layers for up to two weeks, which is a lifesaver when you're planning ahead. Assemble everything the morning of your party or the night before, keeping the finished cake in the fridge until serving time. This way you're not stressed and the cake looks fresh and pristine when it's time to shine.
- Baked layers keep for three days at room temperature if wrapped well, preventing staling and giving you flexibility.
- Frosted but not yet sliced, the cake actually improves after a night in the fridge as flavors meld together.
- Slice with a long, sharp knife dipped in hot water and wiped clean between cuts for pristine, colorful slices.
 Save to Pinterest
 This cake is proof that a little planning and a lot of color can transform a simple celebration into something unforgettable. Bake it, watch the magic happen, and enjoy those moments when dessert becomes memory.
Questions & Answers
- → How do I create the rainbow layers?
Divide the batter evenly and tint each portion with different gel food coloring before baking to achieve vibrant layers.
- → What candies work best for the center?
Small candies such as mini M&Ms, sprinkles, and gummy bears fit well inside the cake’s cavity without altering its texture.
- → Can I prepare the layers ahead of time?
Yes, baking layers in advance and chilling them helps with easy assembly and cleaner slicing.
- → How do I cut the hole in the layers?
Use a 3-inch round cutter to remove the center from selected layers, creating space for the candy filling.
- → What is the best way to frost the cake?
Apply a thin layer of frosting between layers and a generous coating on the outside for smoothness and decoration.