 Save to Pinterest
 I still remember the moment I discovered the Fibonacci spiral—it was during a late-night internet rabbit hole about sacred geometry, and I couldn't stop thinking about how nature's most elegant patterns could be baked into bread. Weeks later, I found myself in my kitchen on a quiet Sunday morning, flour dust dancing in the light, attempting to translate mathematical beauty into something you could actually break bread with. That first loaf was imperfect, but something magical happened when I sliced into that spiral. My family gasped. It became the recipe I've returned to again and again, each time falling deeper in love with the way math and fermentation create something simultaneously stunning and delicious.
I'll never forget baking this for a friend's book club—she told me later that people spent more time photographing the bread than discussing the novel. That's when I knew this recipe had transcended being just dinner and become theater, ceremony, something that made people slow down and appreciate craft.
Ingredients
- Strong bread flour, 500 g: Choose high-protein bread flour (13–14% protein) rather than all-purpose; it gives you that chewy, open crumb and helps the dough develop enough strength to hold those seven gorgeous spiral segments without collapsing
- Water, 350 ml lukewarm: Lukewarm means about body temperature—it wakes up your yeast or starter without shocking it, and this amount creates a beautifully slack, extensible dough that's a joy to work with
- Sourdough starter or instant yeast: If using starter, make sure it's active and bubbly, fed within 4–8 hours of mixing; if using yeast, the instant variety dissolves faster and more evenly than active dry, which matters for consistent rise
- Fine sea salt, 10 g: Fine salt dissolves instantly and distributes evenly; it strengthens gluten development and seasons the entire loaf, not just the surface
- Olive oil, 15 ml: This enriches the dough slightly, creating a softer, more tender crumb while the additions handle all the texture and flavor drama
- Toasted sunflower seeds, 20 g: Toasting them first concentrates their flavor and prevents them from softening into mush during the long fermentation—the smallest addition starts your spiral story
- Walnuts, chopped, 30 g: Toast these lightly too; their earthiness bridges the seeds and the saltier elements coming later in the spiral
- Pumpkin seeds, 40 g: These stay pleasantly firm and add a subtle sweetness that contrasts beautifully with olives and tomatoes downstream
- Hard cheese (Gruyère or Parmesan), 50 g grated: This is where umami enters; the saltiness and richness anchor the spiral and create those golden-brown pockets in the crumb
- Sun-dried tomatoes, 60 g chopped and drained: Drain them well—excess oil or moisture is the enemy of good dough structure; their tangy intensity prepares your palate for the final savory layers
- Mixed olives, 70 g pitted and chopped: Use olives you actually love eating; their brine adds complexity and a sophisticated finish to each slice
- Sautéed spinach, 80 g well-drained: This goes in last, the largest segment; cook it down until all moisture evaporates, then squeeze it again in a clean kitchen towel—waterlogged spinach ruins dough structure
Tired of Takeout? 🥡
Get 10 meals you can make faster than delivery arrives. Seriously.
One email. No spam. Unsubscribe anytime.
Instructions
- Autolyse: Let flour and water become friends:
- Mix your flour and lukewarm water in a large bowl until there are no dry streaks—it'll look shaggy and rough, almost reluctant to come together. Cover it loosely and walk away for 30 minutes. This rest period, called autolyse, lets the flour fully hydrate and gluten strands begin forming on their own, which means less kneading work for you later and a more extensible dough. You'll feel the difference when you return to it.
- Develop the dough: Bring starter, salt, and oil into the mix:
- Stir in your active sourdough starter (or instant yeast), salt, and olive oil. The dough will seem impossibly sticky at first—this is correct. Using wet hands or a dough scraper, mix everything until there's no visible dry flour, then turn it onto a lightly floured surface. Knead for 8–10 minutes, using the heel of your hand to push the dough away from you, then fold it back over itself. It'll go from sticky and rough to smooth and elastic; you'll feel it suddenly come alive under your hands. When you poke it gently, it should spring back slowly, not immediately.
- First rise: The long, slow fermentation:
- Place your dough in a lightly oiled bowl, cover loosely (a damp towel works perfectly), and let it rise at room temperature for 8–12 hours. The timing depends on your kitchen's warmth—cooler kitchens take longer, and that's actually better for flavor development. You're looking for the dough to roughly double in size, become jiggly and alive when you nudge the bowl, and smell complex and slightly tangy. This long fermentation is where the magic happens; resist the urge to rush it with heat.
- Divide and conquer: Seven portions await their unique identities:
- Once risen, turn your dough onto a lightly floured surface. Using a dough scraper or bench knife, divide it into 7 roughly equal portions. Don't be precious about exact weights—you're aiming for proportional pieces, with the first slightly smaller and each subsequent piece slightly larger. Gently pre-shape each into a loose round; this prevents them from drying out while you work.
- Build the spiral story: Knead in your additions, smallest to largest:
- Here's where the Fibonacci sequence comes alive. Take your smallest portion and gently knead in the toasted sunflower seeds—use wet hands to prevent sticking, and fold and turn the dough until the seeds are evenly distributed. Place this portion aside on a lightly floured surface. Repeat with the remaining six portions, moving through walnuts, pumpkin seeds, cheese, sun-dried tomatoes, olives, and finally the well-drained sautéed spinach. Each time, you're increasing both the amount of additions and the portion size, creating a beautiful progression. The dough will feel increasingly dense and textured as you go; trust that this is intentional.
- Shape the spiral: Roll and coil with intention:
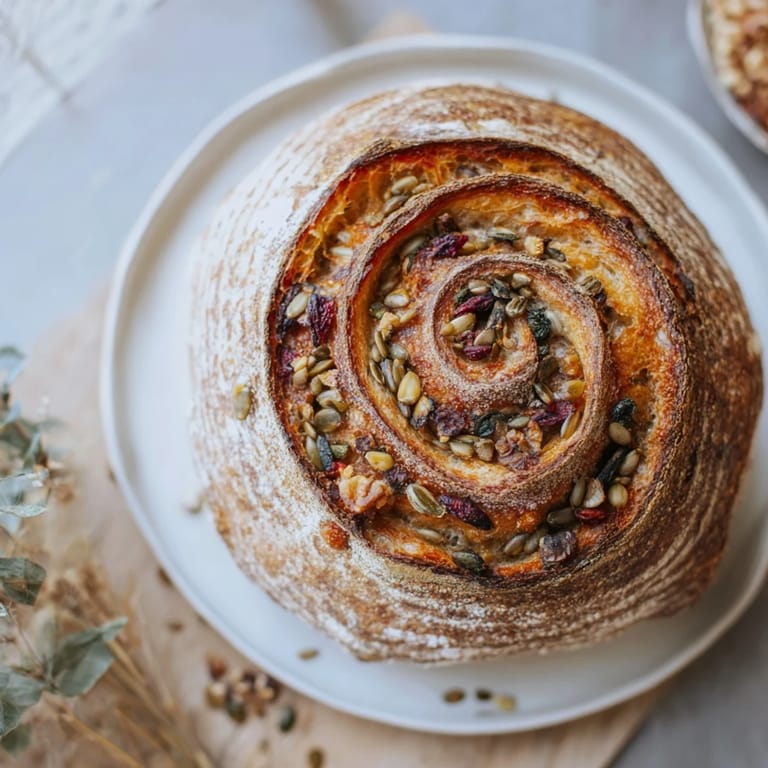
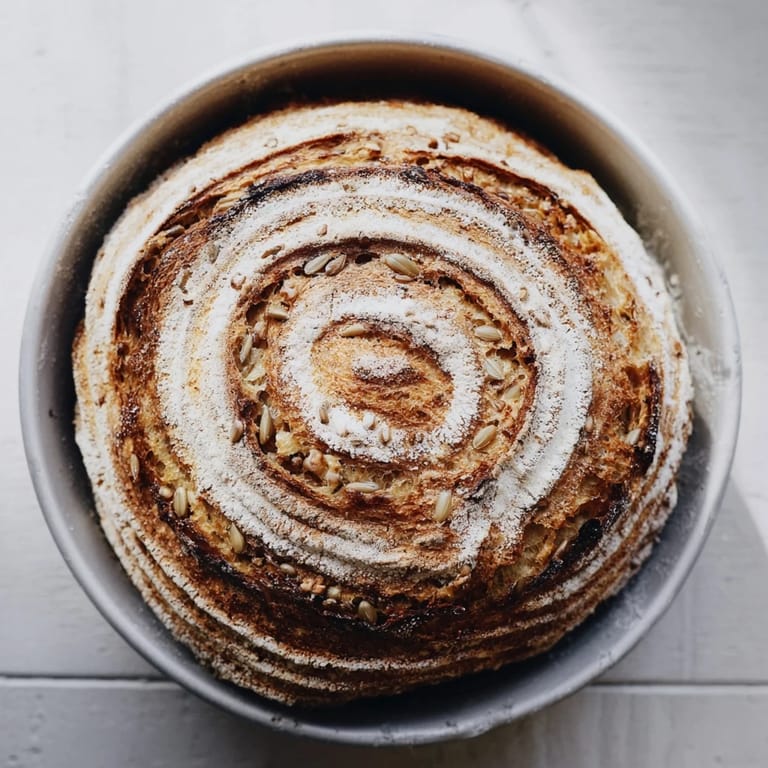
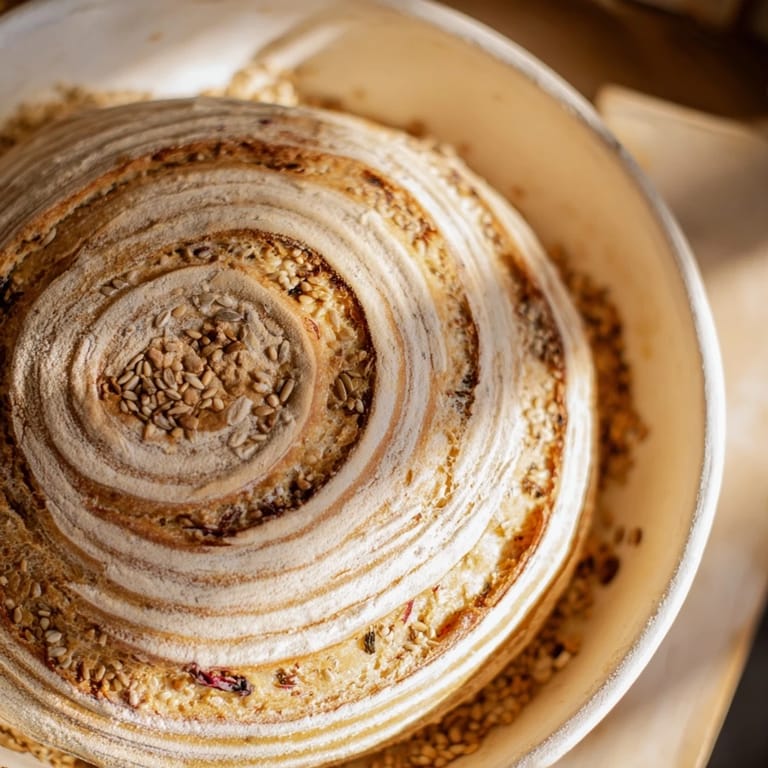
- Roll each portion into a rope, starting with the smallest. They should be roughly the same thickness but increasing in length. On a parchment-lined baking sheet, start with your smallest rope and coil it around a central point, pressing the end to secure it. Take your next rope and continue the spiral, coiling around the previous one and pressing the end to seal. Keep going, building outward like a nautilus shell. The visual result is hypnotic, and the structural integrity comes from those pressed seams holding everything together.
- Final rise: Let it puff gently:
- Cover the shaped spiral loosely with a towel and let it rise at room temperature for about 1.5 hours. You're looking for it to become noticeably puffy, with a slight jiggle when you nudge the pan. Don't over-proof—if it rises too much, the segments may lose their definition during baking.
- Oven preparation: Set the stage for steam and crust:
- Preheat your oven to 230°C (445°F) about 15 minutes before baking. Place an empty metal tray or cast-iron skillet on the oven's lowest rack—this is your steam generator, and it's non-negotiable for that crisp, crackling crust.
- Score with confidence: Slash the spiral lines:
- Dust your risen loaf lightly with flour. Using a sharp blade (a bread lame, utility knife, or even a clean razor blade), make shallow, confident slashes that follow the spiral's pattern or simply create some decorative lines across the top. These cuts allow steam to escape in controlled ways and give the loaf room to expand upward rather than outward.
- Bake with steam: The oven spring moment:
- Carefully pour a cup of very hot water into the preheated tray on the oven floor—step back quickly to avoid the steam burst. Immediately place your bread on the middle rack. Bake for 40 minutes, rotating the pan halfway through (around the 20-minute mark) to ensure even browning. The loaf should emerge deep golden-brown, with a crackling crust that sounds almost musical when you tap it. The spiral will have expanded, and each segment should show its own color variation—an edible map of your journey through the additions.
- Cool completely: Patience for the perfect slice:
- Transfer the hot bread to a wire rack and let it cool for at least 2 hours before slicing. This isn't just about the crumb setting—as it cools, the interior continues to firm up, flavors integrate and deepen, and you get those clean, beautiful spiral cross-sections when you finally cut into it. I know it's hard to wait, but this step makes all the difference.
 Save to Pinterest
 I made this bread for my daughter's art show opening, and someone asked if it was edible or a sculpture. When she said 'both,' and I watched people's faces light up at that idea—that something beautiful and functional could coexist—I realized I'd accidentally created more than a recipe. I'd created a conversation about intentionality, patience, and the quiet poetry of making things with your hands.
Why This Spiral Works
The Fibonacci sequence appears everywhere in nature—in nautilus shells, sunflower seeds, pinecones—and there's something deeply satisfying about following that mathematical logic while baking. But here's what makes it work practically: each spiral segment, with its increasing amount of additions and denser ingredients, bakes at slightly different rates. The smaller, seed-studded center crisps up beautifully while the larger outer segments stay tender. The visual drama is real, but so is the flavor architecture—you're not just showing off; you're creating a bread that's genuinely more interesting to eat than a uniform loaf.
Building Flavor Through Fermentation
That 8–12 hour fermentation isn't just about rise time; it's about transformation. The longer your dough ferments, especially with sourdough starter, the more complex flavors develop. Wild yeast and bacteria break down proteins and starches, creating the subtle tanginess and depth you simply can't achieve with commercial yeast and a quick rise. By the time you're kneading in your cheese and olives, you already have a foundation of flavor that makes those additions sing rather than shout. The additions themselves also benefit—the oils in the nuts oxidize slightly, the seeds deepen in flavor, the tomatoes meld rather than remaining separate ingredients.
The Spiral Shaping Technique and Three Bonus Tips
Shaping the spiral takes a bit more thought than a simple round, but it's less intimidating than it seems. The key is that each rope must be sealed at the seam; otherwise, the segments separate during baking and you lose the visual magic. Work gently but deliberately, and remember that the dough has already done most of the hard work during fermentation—your job is simply to arrange it beautifully.
- If your ropes start to resist or shrink while you're shaping, let them rest for 5–10 minutes uncovered; the gluten is just being stubborn and will relax on its own
- Use parchment paper rather than a bare baking sheet; it prevents sticking and makes transferring the delicate spiral into a hot oven infinitely easier
- If you can't find olives you love, substitute more of any ingredient you adore—this recipe is flexible enough to celebrate your preferences while maintaining the Fibonacci progression
 Save to Pinterest
 This bread teaches you something every time you make it: that beauty and function aren't opposing forces, and that the most memorable dishes are the ones made with intention and a little bit of playfulness. Make it, share it, and watch how something as simple as bread becomes the thing people remember about your kitchen.
Questions & Answers
- → How does the Fibonacci spiral affect the loaf?
The spiral shapes the loaf by coiling ropes of dough with increasing ingredient density, creating layered texture and visual appeal.
- → Can I substitute ingredients in the spiral additions?
Yes, any combination of seeds, nuts, and vegetables can be used, adjusting quantities progressively through the spiral.
- → What is the ideal rising time for this dough?
A long rise of 8–12 hours at room temperature allows the dough to develop flavor and elasticity before shaping.
- → How is the crust kept crisp during baking?
Adding steam during baking by placing hot water in the oven tray helps create a crisp, golden crust.
- → Is there a vegan-friendly option for this loaf?
Omit the cheese or replace it with vegan alternatives while maintaining the layering technique in the spiral.
- → What tools are recommended for shaping the loaf?
Use a large mixing bowl, dough scraper, parchment paper, baking sheet, and a sharp blade for scoring the dough.