 Save to Pinterest
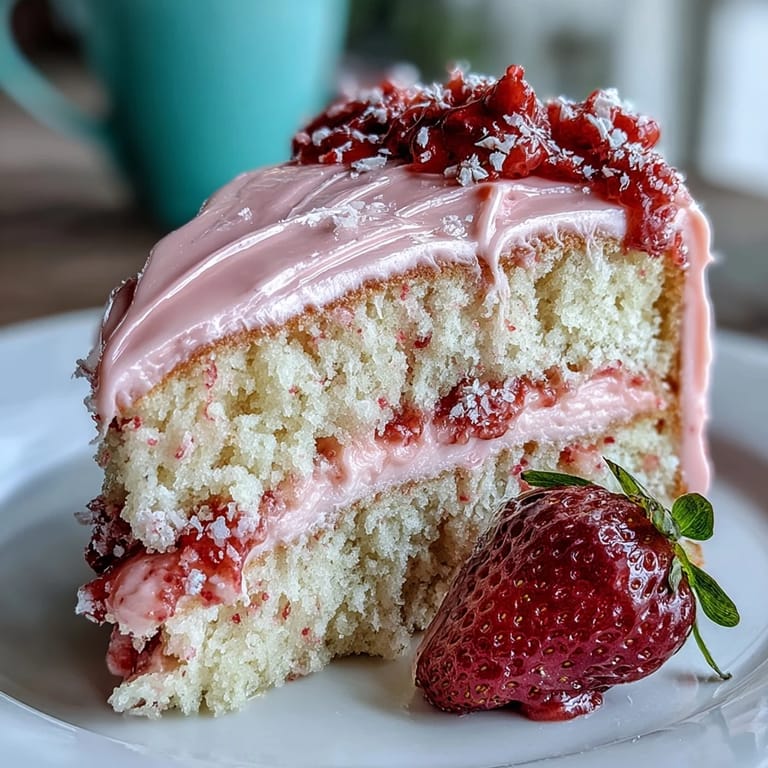
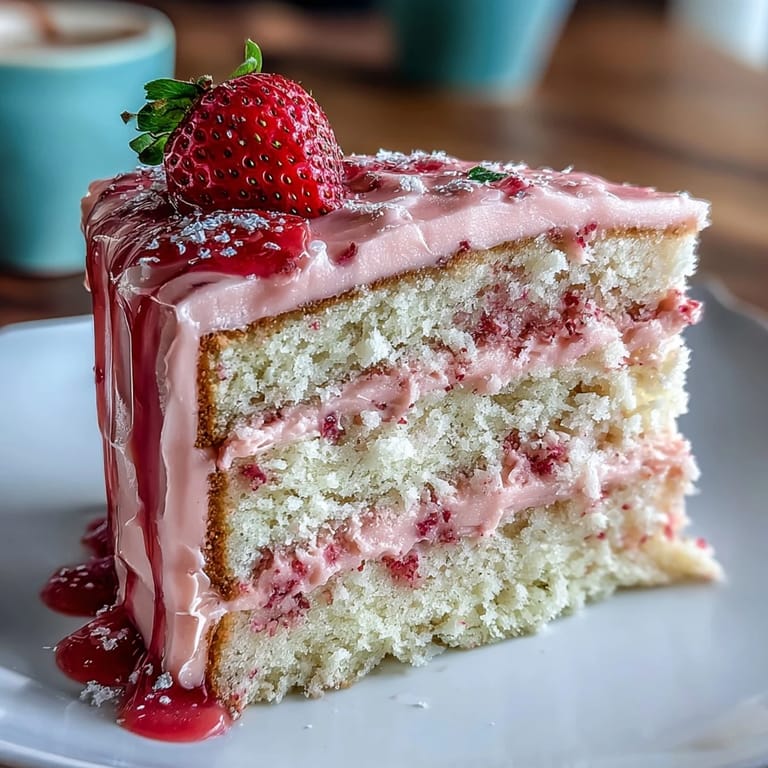
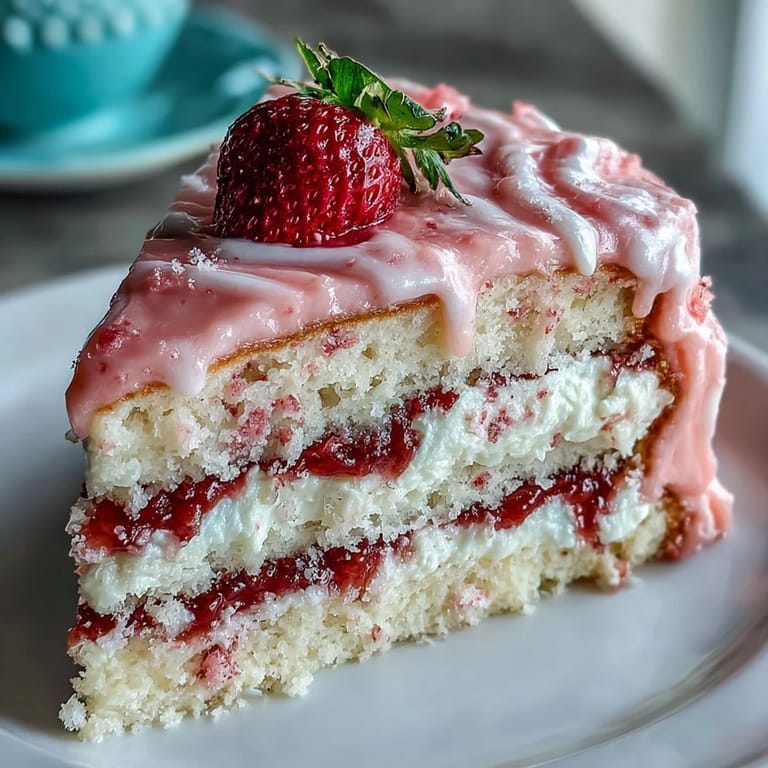
 My sister texted me a photo of the most stunning pink ombre cake she'd spotted at a bakery, then immediately said, "Too expensive, but imagine if we made it ourselves." That challenge stuck with me until Valentine's Day rolled around, and I decided to prove that a three-layer masterpiece with that dreamy strawberry buttercream gradient wasn't just possible—it was actually fun to pull off. The first attempt taught me patience; the second taught me confidence; and by the third time, my kitchen smelled like vanilla and strawberries in the most perfect way.
I made this for my best friend's engagement party last spring, and watching people's faces when they walked into the dining room and saw it sitting there—that moment was worth every minute of layering and piping. She cried, which wasn't dramatic for her, but it meant something about the cake itself felt like a celebration of all the love we were marking that day. That's when I realized this cake had become my go-to for occasions that matter.
Ingredients
- All-purpose flour: The foundation of a tender crumb; sift it with the baking powder and salt to avoid lumps that'll sneak into your layers.
- Baking powder: This is what gives the cake its lift and airy texture, so don't skimp or swap it out.
- Fine salt: Balances the sweetness and makes the vanilla sing without tasting salty itself.
- Unsalted butter, room temperature: Cold butter won't cream properly; set it out an hour before mixing so it's soft enough to leave a slight fingerprint.
- Granulated sugar: Creaming it with the butter creates the air pockets that make the cake fluffy.
- Large eggs, room temperature: Cold eggs won't incorporate smoothly; they warm up faster if you set them in a bowl of hot water for a minute.
- Pure vanilla extract: The real stuff matters here because you taste it directly, not hidden behind chocolate.
- Whole milk, room temperature: This prevents the batter from seizing up when you alternate mixing it in.
- Unsalted butter for buttercream: Fresh and room temperature so it whips into a cloud.
- Powdered sugar, sifted: Sifting removes lumps that would create a grainy frosting no matter how much you beat it.
- Freeze-dried strawberries, finely ground: These are the secret to intense strawberry flavor without soggy frosting; grind them in a food processor until they're almost a powder.
- Heavy cream or milk: Just enough to loosen the frosting without making it weepy.
- Vanilla extract: A touch in the frosting deepens the flavor without making it taste like pure sugar.
- Pink gel food coloring: Gel won't thin out your frosting like liquid coloring would, and it creates those rich, Instagram-worthy shades.
- Fresh strawberries and edible glitter: Optional but they turn something beautiful into something unforgettable.
Tired of Takeout? 🥡
Get 10 meals you can make faster than delivery arrives. Seriously.
One email. No spam. Unsubscribe anytime.
Instructions
- Get your mise en place ready:
- Preheat the oven to 350°F and grease and line three 8-inch round cake pans with parchment paper so you're not fumbling later. Set out all your ingredients so they're truly room temperature—this makes a visible difference in how the batter comes together.
- Mix the dry ingredients:
- Whisk flour, baking powder, and salt in a medium bowl, breaking up any lumps. This aerates the flour and distributes the leavening evenly.
- Cream the butter and sugar:
- In a large bowl or stand mixer, beat the softened butter and sugar on medium-high for about 3 minutes until it's pale, fluffy, and looks almost like frosting itself. Stop and scrape the bowl halfway through to make sure everything is getting incorporated.
- Add the eggs one at a time:
- Beat each egg in completely before adding the next; this builds structure and keeps the batter from looking curdled. Once all four are in, add the vanilla extract and mix until smooth.
- Alternate your wet and dry:
- Add about a third of the flour mixture, then half the milk, then another third of flour, then the rest of the milk, and finally the last of the flour, mixing just until combined after each addition. Do not overmix; this is where people accidentally make tough cake.
- Divide and smooth:
- Pour the batter evenly into the three prepared pans and smooth the tops gently with an offset spatula. Even layers bake more evenly.
- Bake until golden:
- Bake for 25 to 30 minutes; your kitchen will smell incredible. A toothpick inserted in the center should come out clean, though if you hit a strawberry buttercream smudge during testing, don't panic—that's just your future baking experience talking.
- Cool with intention:
- Let the cakes rest in the pans for 10 minutes so they set enough to handle, then turn them out onto wire racks and cool completely. Frosting warm cake is a recipe for melted sadness.
- Make the strawberry buttercream:
- Beat softened butter until it's creamy and pale, then gradually add sifted powdered sugar so you don't create a flour cloud in your kitchen. Fold in the ground freeze-dried strawberries, heavy cream, vanilla, and salt, then beat on high until it transforms into fluffy, pillowy frosting.
- Create the ombre:
- Divide the buttercream into three bowls; leave one plain (or very pale pink), tint the second a light pink, and the third a deep pink using gel coloring a tiny bit at a time. These three shades will become your gradient.
- Pipe with confidence:
- Transfer each shade into its own piping bag; you'll use these to create that dreamy blended effect on the outside.
- Level and layer:
- If your cake layers are domed on top, carefully slice them flat with a serrated knife or a cake leveler. Place the first layer on your serving plate and spread it with the lightest pink buttercream, then repeat with the second layer using medium pink, and top with the third layer.
- Achieve the ombre magic:
- Spread the darkest pink buttercream around the bottom third of the cake, medium pink in the middle, and lightest pink on top, using an offset spatula or cake scraper to gently blend the colors where they meet. The blending is what creates that soft, ombréd effect instead of harsh stripes.
- Final touches and chill:
- Garnish with fresh strawberries and edible glitter if you're feeling celebratory, then refrigerate for at least 30 minutes so the layers set and you can slice cleanly. The cold also keeps the frosting from sliding around.
 Save to Pinterest
 I'll never forget my neighbor stopping by just as I was finishing the ombre effect, watching silently for a moment, then asking if I'd made it myself—and the pure joy when I said yes. She asked for the recipe that same day, and now it's become this little thread between us, our standing Valentine's tradition where we text photos of our attempts and celebrate the inevitable small imperfections that somehow make them even better.
Why Freeze-Dried Strawberries Change Everything
Fresh strawberries have moisture that would make buttercream separate and weep, but freeze-dried ones are pure flavor without the water. I learned this the hard way after making a batch with fresh strawberry purée that looked beautiful for exactly seven minutes before it started sliding off the cake. Now I'm a believer in the magic of freeze-dried fruit, and honestly, the flavor is more concentrated and bright than fresh could ever be.
Leveling Cake Layers Without Stress
If your cakes dome on top (most home ovens create a slight dome), you have two options: a serrated bread knife used with a gentle sawing motion, or an actual cake leveler if you're feeling fancy. The goal is flat, even layers that stack without sliding around like a Jenga game gone wrong. I've done both methods, and honestly, the bread knife works just fine if you go slow and trust your instincts.
The Art of Blending the Ombre
The ombre effect looks complicated but is actually just about patience and a steady hand with your offset spatula. Work in sections, spreading the darkest shade around the bottom, then feathering it upward where it meets the medium pink, and so on until the medium meets the light. This creates a gradient that looks intentional and soft instead of striped. The key is light pressure and not overthinking it—if you blend too much, you'll just end up with one peachy middle ground, which honestly is fine too.
- Start with the darkest shade at the bottom and work your way up so gravity helps with blending.
- Use a clean offset spatula or damp towel between color changes to avoid muddy transitions.
- Remember that the cake will chill for 30 minutes, which sets the frosting and makes blending look even smoother by the time you serve it.
 Save to Pinterest
 This cake has taught me that beautiful, impressive desserts don't require secret techniques or ingredient lists longer than a poem—just a little patience, room temperature ingredients, and the willingness to embrace imperfection as part of the charm. Make it once and it becomes yours, then you'll make it again for someone you love.