 Save to Pinterest
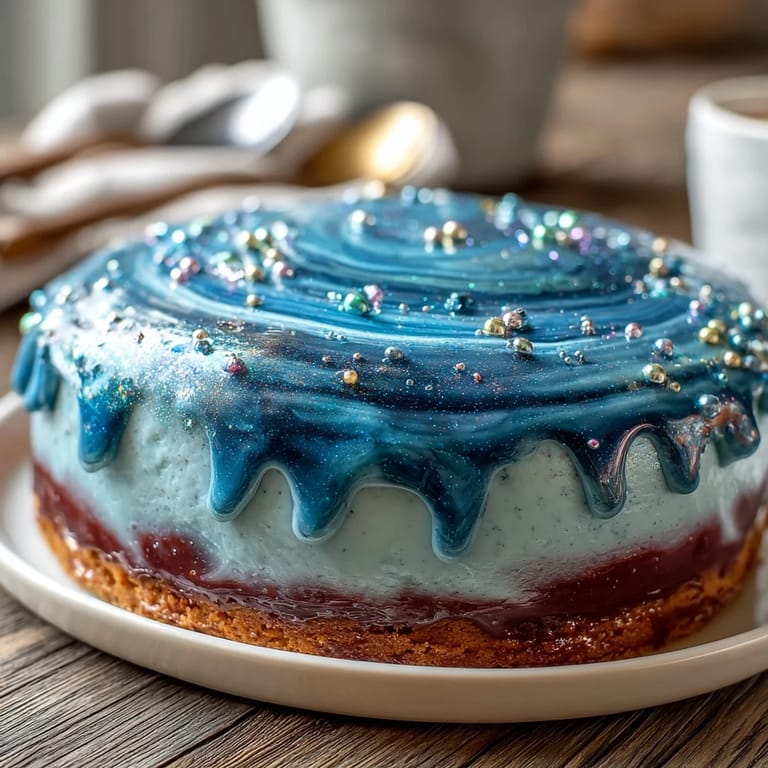
 My friend called me on a Tuesday afternoon asking if I could make her a birthday cake that felt cosmic, otherworldly, something that would make her guests gasp. She's a Pisces, naturally, swimming through life with that dreamy energy, and I found myself staring at my kitchen thinking: what if I could bottle that constellation into buttercream? That's when this galaxy cake was born—not from a recipe book, but from the pure joy of wanting to create something that looked like it belonged in the night sky.
I'll never forget frosting this cake at midnight the night before her party, my kitchen radio playing something soft, the edible glitter catching the under-cabinet lights like actual stars. My hands were shaking a little—not from nerves, but from that specific electricity you feel when you're creating something that's about to make someone happy. She cried when she saw it, and I realized then that baking isn't just about flavor; sometimes it's about translating feelings into something people can hold.
Ingredients
- All-purpose flour (2 ½ cups): The foundation—make sure it's at room temperature so your batter incorporates smoothly without becoming tough.
- Baking powder (2 ½ tsp): This is your lift; don't skip it or your layers will sink into themselves.
- Salt (½ tsp): A pinch that awakens the vanilla and keeps the sweetness from becoming one-dimensional.
- Unsalted butter (1 cup for cake, 1 ½ cups for frosting): Room temperature is non-negotiable—cold butter won't cream properly and you'll end up with a dense crumb.
- Granulated sugar (2 cups): Creamed with butter until it looks like wet sand, this creates air pockets that make the cake tender.
- Eggs (4 large): Room temperature eggs blend evenly into the batter; cold ones create lumps and uneven texture.
- Pure vanilla extract (1 tbsp for cake, 2 tsp for frosting): Quality matters here—it's what makes people ask what that mysterious flavor is beneath the sweetness.
- Whole milk (1 cup for cake, ¼ cup for frosting): Room temperature milk prevents the batter from seizing up and keeps everything luxuriously soft.
- Powdered sugar (5 cups, sifted): Sifting removes lumps before mixing, saving you from grainy frosting that won't swirl smoothly.
- Gel food coloring (navy, purple, black, teal): Gel holds color intensity better than liquid; a tiny drop goes far and won't thin your frosting.
- Edible glitter (silver, blue, or iridescent): This is your magic—choose quality food-safe glitter so it actually shimmers and doesn't taste metallic.
Tired of Takeout? 🥡
Get 10 meals you can make faster than delivery arrives. Seriously.
One email. No spam. Unsubscribe anytime.
Instructions
- Prepare Your Stage:
- Preheat your oven to 350°F and grease three 8-inch pans with butter, then line them with parchment—this double protection means your cakes will release cleanly. Grab three bowls and organize your ingredients; baking moves fast once you start.
- Build Your Dry Mix:
- Whisk flour, baking powder, and salt together in a medium bowl. This aerates the flour and distributes the leavening evenly so your cake rises uniformly.
- Cream Butter and Sugar:
- Beat room-temperature butter and sugar together for 3-4 minutes until it looks pale and fluffy, like clouds. This step is where air gets trapped, creating lift—rushing it means a dense, heavy cake.
- Introduce the Eggs:
- Add eggs one at a time, beating well after each, so they emulsify fully into the butter mixture. If it looks curdled or broken, don't panic; it'll come together once you add the flour.
- Weave in Dry and Wet:
- Alternate adding flour mixture and milk, starting and ending with flour. This prevents overmixing and keeps the batter tender—mix just until combined, no more.
- Divide and Bake:
- Distribute batter evenly among pans and bake 25-30 minutes until a toothpick comes out clean. Your kitchen will smell like pure vanilla heaven—that's when you know it's working.
- Cool with Patience:
- Let cakes sit in pans for 10 minutes (they're still setting), then turn onto wire racks to cool completely. Frosting warm cake is a disaster; patience here prevents frosting from melting into puddles.
- Make Your Galaxy Frosting:
- Beat softened butter until creamy, then gradually add sifted powdered sugar, milk, and vanilla, beating until smooth and fluffy. You want frosting that holds peaks but spreads smoothly.
- Paint With Color:
- Divide frosting into four bowls and tint each with gel color—navy, purple, teal, and black. Start with tiny amounts of color; you can always add more, but you can't take it back.
- Layer Like a Galaxy:
- Place the first cake layer on your serving plate, then alternate spoonfuls of colored frosting onto the layer and sides. Use an offset spatula to swirl gently—think of nebulae, not perfect roses.
- Shimmer and Shine:
- Sprinkle edible glitter generously over the whole cake while the frosting is still soft enough to catch it. If you want extra drama, brush the cake lightly with clear vodka first—it helps glitter adhere and adds subtle sparkle.
- Set the Design:
- Chill for 30 minutes so the frosting sets and the swirls hold their shape when you slice. Add fondant Pisces symbols or silver star sprinkles now if you're feeling decorative.
 Save to Pinterest
 There's something about watching someone blow out candles in front of a cake that looks like the universe decided to visit their dessert plate. In that moment, the cake becomes more than sugar and butter—it becomes a memory, a story, proof that you spent time creating beauty just for them.
The Science of Swirling
When I first tried to create the galaxy effect, I was thinking too hard about technique—overthinking where each color should go. But then I realized the magic happens when you let the colors blend naturally, when you trust that imperfection is exactly what makes a galaxy look alive. The swirls don't need to be controlled; they need to feel organic, like you're capturing actual nebulae rather than designing them. A gentle hand and random placement will always look more cosmic than anything you could carefully plan.
Flavor Variations and Personal Touches
The vanilla-forward flavor is intentional—it lets the visual spectacle be the star. But I've learned that substituting half a teaspoon of almond extract for some of the vanilla creates this mysterious depth that people can't quite name. You could also brush a thin layer of apricot jam between layers for subtle fruit undertones, or add a tablespoon of lemon zest to the batter if you want brightness cutting through the sweetness. The beauty is that this cake's structure is strong enough to support your creativity.
Storage and Serving Secrets
This cake actually improves after a day—the sponge becomes more moist and the flavors settle into each other like they've made peace. Cover it loosely with plastic wrap and keep it at room temperature for up to three days, or refrigerate for up to five days if your kitchen runs warm. When you slice it, use a hot, wet knife and wipe it clean between cuts—this prevents frosting from dragging and smudging your beautiful galaxy design.
- Serve slices at room temperature for the best vanilla flavor and frosting texture.
- Pair with sparkling Moscato or a light lemonade to echo the celestial, airy feel.
- If you make this for a warm-weather party, assemble it in a cool kitchen and keep it shaded until serving time.
 Save to Pinterest
 This cake taught me that sometimes the most meaningful recipes are the ones you create for a specific person, in a specific moment. Make it, share it, and watch the magic happen.
Questions & Answers
- → How do you achieve the galaxy swirl effect?
Use multiple colors of tinted buttercream applied in spoonfuls around the cake layers and sides, then gently swirl with an offset spatula to blend colors without overmixing.
- → What types of edible glitter work best?
Silver, blue, and iridescent edible glitters add sparkle while complementing the galaxy colors without overpowering the cake's look.
- → Can I use a different flavor extract?
Yes, substituting almond extract for vanilla gives a different but complementary flavor that pairs well with the buttercream and sponge.
- → How do I keep the cake moist?
Ensure not to overbake the sponge and fully cool it before applying buttercream; gentle folding and balanced ingredient ratios help maintain moisture.
- → What tools are recommended for decoration?
Use an electric mixer for smooth buttercream, offset spatula for swirling, parchment paper for lining pans, and a food-safe paintbrush for applying glitter evenly.