 Save to Pinterest
 The smell of frying onions always stops me in my tracks, no matter what I am doing in the kitchen. I stumbled onto this idea one rainy afternoon when I was craving something more than the usual grilled cheese but did not want to make an entire production out of dinner. Those first crispy onions hit the hot oil and suddenly my whole apartment smelled like a state fair.
My roommate walked in while I was frying that first batch and literally hovered over the stove until I offered her a taste. Now every time she smells onions hitting hot oil, she texts me asking if it is grilled cheese night. We have started keeping a jar of pre-made crispy onions just for emergencies.
Ingredients
- 1 small yellow onion, thinly sliced: The sweetness of yellow onions works perfectly here, and slicing them thin ensures they crisp up beautifully
- 1/2 cup all-purpose flour: Creates the base coating that gets golden and crunchy
- 1/4 cup cornstarch: The secret to extra crispiness that lasts longer than flour alone
- 1/2 teaspoon each salt, black pepper, and paprika: Essential seasoning that makes the onions taste like something special
- 1/2 cup buttermilk: Helps the coating stick and adds a subtle tang, though regular milk with lemon juice works too
- Vegetable oil for frying: You need enough to create a shallow bath for even frying
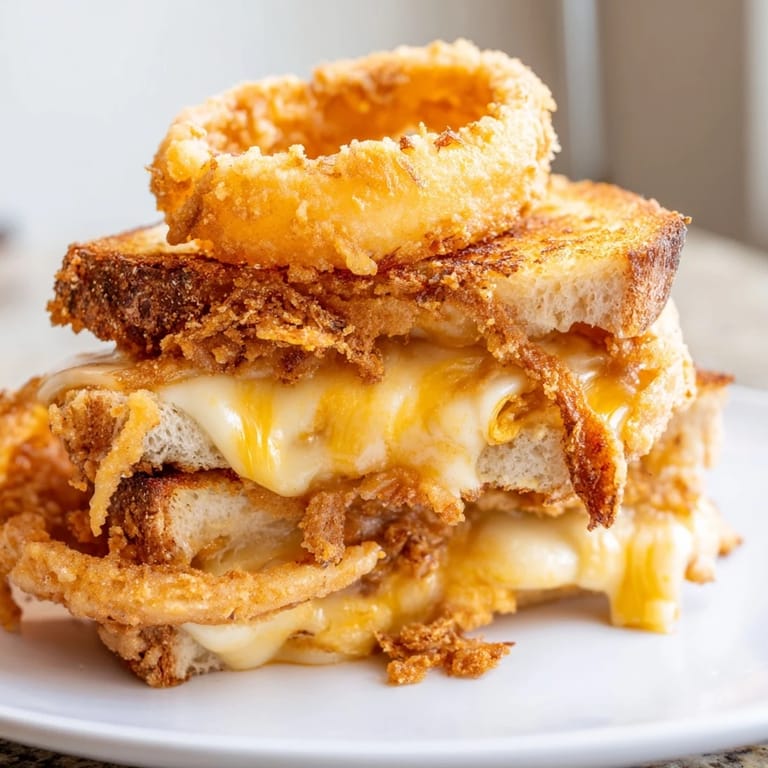
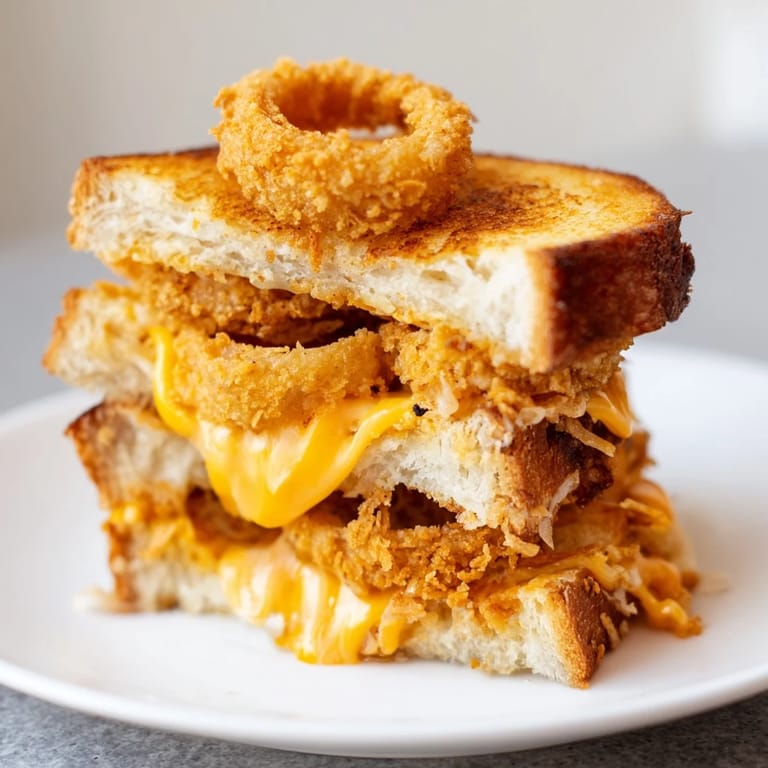
- 4 slices sourdough bread: Sourdough holds up well to the weight of all those toppings and toasts beautifully
- 4 tablespoons unsalted butter, softened: Buttering the bread exterior creates that golden, crispy crust we all want
- 1 cup sharp cheddar, grated: Sharp cheddar brings the bold flavor punch that stands up to the onions
- 1 cup mozzarella cheese, grated: Mozzarella provides the incredible melt and stretch factor
Tired of Takeout? 🥡
Get 10 meals you can make faster than delivery arrives. Seriously.
One email. No spam. Unsubscribe anytime.
Instructions
- Make the crispy onions first:
- Whisk together the flour, cornstarch, salt, pepper, and paprika in a shallow bowl. Pour the buttermilk into another bowl. Dip each onion slice into the buttermilk, letting excess drip off, then press into the flour mixture until well coated.
- Fry until golden:
- Heat about an inch of vegetable oil in a skillet over medium-high heat until it shimmers. Fry the onions in batches, turning once, until they are golden brown and crispy, about 2 to 3 minutes per batch. Drain on paper towels and sprinkle with a little salt while still hot.
- Build your sandwich base:
- Butter one side of each bread slice generously. Place two slices butter side down on your work surface.
- Layer like a pro:
- Sprinkle half the cheddar and mozzarella on each slice, then pile on a generous layer of those crispy onions. Top with the remaining cheese, then place the remaining bread slices on top, butter side facing up.
- Grill to perfection:
- Heat a nonstick skillet or griddle over medium-low heat. Cook the sandwiches for about 3 to 4 minutes per side, pressing gently with a spatula, until the bread is deeply golden and the cheese is completely melted.
- Rest and serve:
- Let the sandwiches rest for just a minute so the cheese sets slightly, then cut diagonally and serve while still hot and crispy.
 Save to Pinterest
  Save to Pinterest
 This sandwich has become my go-to comfort food, the thing I make when someone has had a hard day or when the weather turns cold and gray. There is something deeply satisfying about biting through that crunchy crust into layers of molten cheese and onions.
Make It Your Own
A swipe of Dijon mustard on the inside of the bread adds a sharp contrast that cuts through all that richness. Sometimes I add a few tomato slices when summer tomatoes are at their peak, letting their juices mingle with the melting cheese.
Timing Is Everything
Keep the fried onions in a warm oven while you assemble and grill the sandwiches so they stay crispy. Cold onions lose their magic, and nobody wants a lukewarm grilled cheese.
Shortcut Options
Store-bought crispy fried onions, like those used for green bean casserole, work in a pinch though they are not quite as special as homemade. You can also make a big batch of onions on Sunday and keep them in an airtight container for quick sandwiches throughout the week.
- Mayo mixed with grated Parmesan creates an incredibly crispy exterior when spread on the bread instead of butter
- A pinch of garlic powder in the onion coating takes the flavor profile in a completely delicious direction
- Serve alongside tomato soup that has been simmering with a sprig of fresh basil for the classic pairing
 Save to Pinterest
 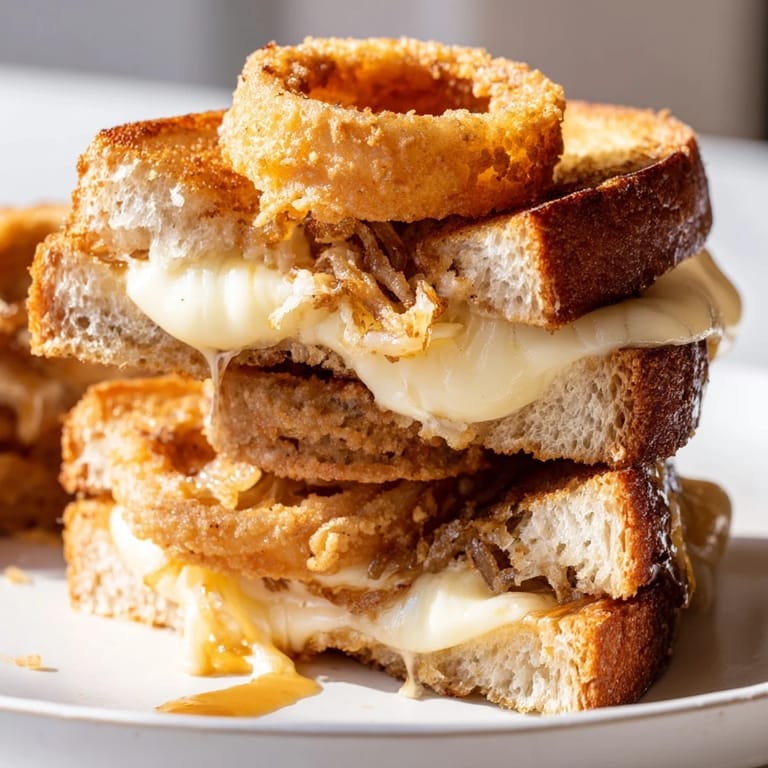 Save to Pinterest
 Hope this sandwich brings as much comfort to your kitchen as it has to mine.
Questions & Answers
- → Can I use store-bought fried onions instead of making them from scratch?
Yes, store-bought crispy fried onions work perfectly as a time-saving shortcut. They'll still provide that satisfying crunch and savory flavor without the extra prep work of frying your own.
- → What type of bread works best for this sandwich?
Sourdough bread is ideal because its sturdy structure holds up well to the hearty filling and provides excellent flavor. White bread, brioche, or even hearty whole grain can also work depending on your preference.
- → Can I make the crispy onions ahead of time?
Absolutely! The fried onions can be prepared up to 2 days in advance and stored in an airtight container at room temperature. Re-crisp them in a 350°F oven for 3-5 minutes before assembling your sandwiches.
- → What other cheeses can I use?
Feel free to experiment with different melting cheeses like Gruyère, Swiss, Provolone, or American cheese. Just ensure you're using cheeses that melt well to achieve that perfect gooey texture.
- → How do I prevent the cheese from leaking out while cooking?
Don't overfill the sandwich and keep the heat at medium-low to allow the cheese to melt gradually. A gentle press with your spatula helps everything stick together, and letting the sandwich rest briefly after cooking prevents the filling from sliding out.